Table of Contents
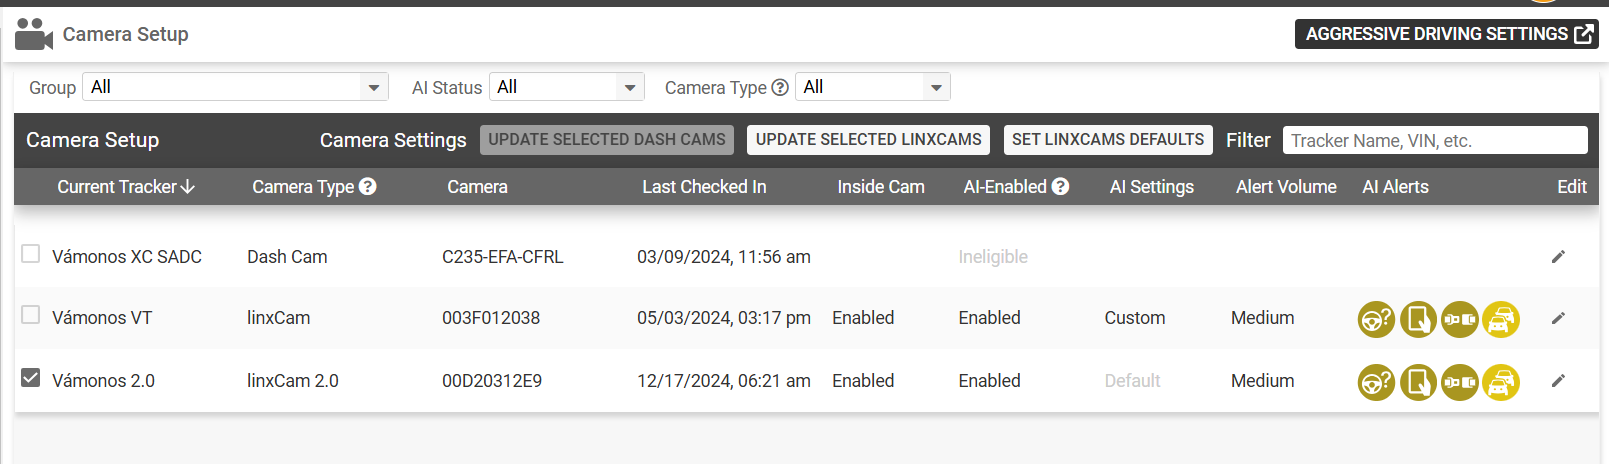
Linxup's updated camera settings feature allows you to:
- Manage camera specific settings on both the Dash Cam and linxCam, including AI alerts.
- View a quick view of the primary settings on each camera.
- View a quick view of what is similar or different between cameras for settings that can be changed by camera.
 |
Video Walkthrough |
How to View and Customize Camera Settings
Camera Settings
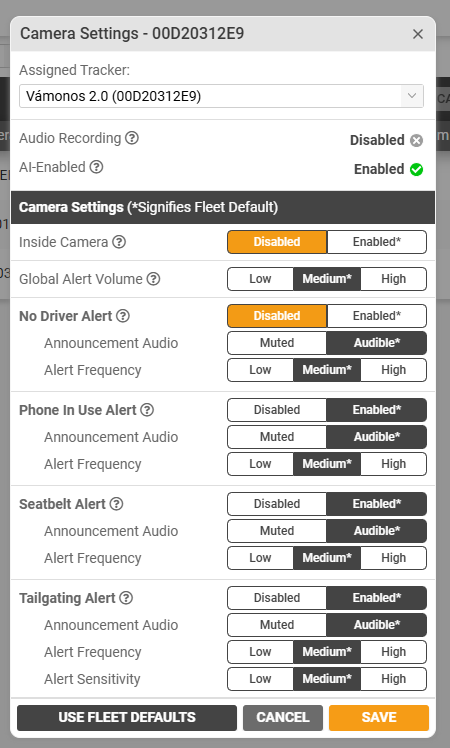
linxCam Settings

Audio Recording
- To enable recording of audio inside the vehicle by the camera please call customer service at 877-732-4980.
AI-Enabled
- If you would like to have Al enabled for your fleet please call customer service at 877-732-4980.
Inside Camera
- If turned off, the driver facing camera will no longer record. If Al is enabled, any alerts requiring driver information will no longer function.
Global Alert Volume
- This controls the volume for all enabled alert announcements.
No Driver Alert
- No Driver Alert monitors whether there may be an obstruction between the driver and the camera.
- For example, this alert will be triggered if a hat is placed over the camera.
- Announcement Audio controls whether the driver can hear an audible alert in the cab.
- Alert Frequency controls the time allowed (in seconds) between alerts.
- Low Frequency - 600 sec
- Medium Frequency - 240 sec
- High Frequency - 90 sec
Phone In Use Alert
- Phone In Use Alert monitors whether an object can be detected in the driver's hand.
- Announcement Audio controls whether the driver can hear an audible alert in the cab.
- Alert Frequency controls the time allowed (in seconds) between alerts.
- Low Frequency - 600 sec
- Medium Frequency - 240 sec
- High Frequency - 90 sec
Seatbelt Alert
- Seatbelt Alert monitors the seatbelt across the driver's body. If blocked, or colors do not contrast enough, this could cause false positives.
- Announcement Audio controls whether the driver can hear an audible alert in the cab.
- Alert Frequency controls the time allowed (in seconds) between alerts.
- Low Frequency - 600 sec
- Medium Frequency - 240 sec
- High Frequency - 90 sec
Tailgating Alert
- Tailgating uses distances between the cars, speed, etc. to determine whether a driver is driving too close for too long.
- Announcement Audio controls whether the driver can hear an audible alert in the cab.
- Alert Frequency controls the time allowed (in seconds) between alerts.
- Low Frequency - 600 sec
- Medium Frequency - 240 sec
- High Frequency - 90 sec
- Alert Sensitivity controls how often the alerts will be triggered (Low = fewer alerts).
- Low Sensitivity (Following Distance) - 0.6 sec
- Medium Sensitivity (Following Distance) - 0.8 sec
- High Sensitivity (Following Distance) - 1.2 sec
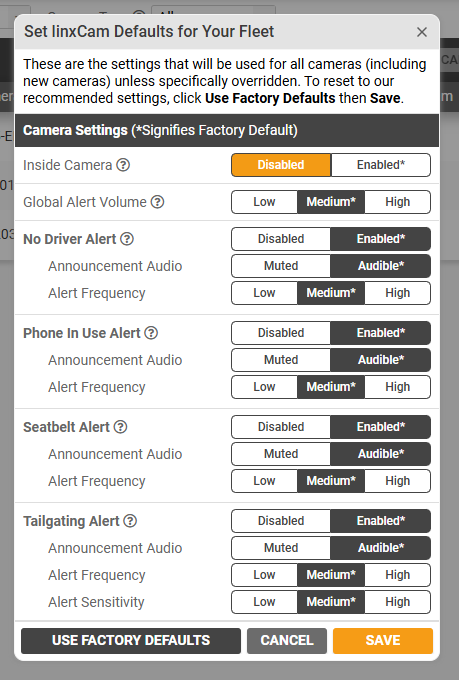
Set linxCam Default Settings
Changing the linxCam default settings offers the opportunity to customize settings across all of your linxCams.
NOTE: The linxCam has the option for Driver Safety alerts including Tailgating, Cell Phone, and Seatbelt use. As a Fleet Manager or Safety Manager, you can adjust the number of alerts received by updating the Frequency or Sensitivity of an alert where available.If you choose, in-cab AI alerting can be turned off while still generating alerts in the mobile and desktop applications. This allows you to easily establish baselines while getting started with new drivers or a new Driver Safety Program.
To set linxCam default settings:
- Select the ‘SET LINXCAMS DEFAULTS’ button from the Camera Setup toolbar.
- Update your settings to your preferences.
- Select ‘SAVE’ to apply your changes.
Fleet defaults are indicated by an *asterisk.
- If a fleet default setting is selected, it will be dark.
- If a non-default setting is selected, it will be orange.
Each alert has a tool tip describing each option that can be updated.
NOTE: Even though linxCam and linxCam 2.0 are considered to be 2 different camera types, the settings are the same. Thus, one fleet default will apply to both linxCam camera types.
Managing Fleet Defaults
Fleet wide defaults can be set for each individual alert. These default settings will be used for new cameras.
- If a change is made to the fleet default, all cameras that had no changes to that particular setting will be updated to the new defaults.
- Cameras that have an individual custom setting will keep their custom settings.
- Example: Camera 1 is using the default settings for all, but Tailgating. If a change is made to the defaults on Tailgating they will not be applied to this camera, but all other settings will change to the new default.
- Cameras that have an individual custom setting will keep their custom settings.
To return any camera(s) to fleet default settings:
- Select the camera(s) to edit.
- Choose the default setting(s) to return them to the fleet default.
- This can be by individual settings OR for all settings using the ‘USE FLEET DEFAULTS’ button.
To return any camera(s) to Linxup defined default settings:
- Select the camera(s) to edit.
- Select the ‘USE FACTORY DEFAULTS’ button.
- This will update ALL of the settings to the Linxup defined defaults.
To return the Fleet Default to Linxup defined default settings:
- Select the ‘SET LINXCAM DEFAULTS’ button.
- Select the ‘USE FACTORY DEFAULTS’ button.
- This will update ALL of the Fleet Default settings to the Linxup defined defaults.
- Cameras using the default settings will be updated.
- Cameras that have an individual custom setting will keep that custom setting(s) and default settings will be updated.
Update linxCam Settings by Vehicle or Fleet
To update a single camera:
- Select the ‘Edit’ pencil icon to the right of your chosen camera.
- Update your settings to your preferences.
- Select ‘SAVE’ to apply your changes.
To update multiple cameras:
- Select the cameras using the checkboxes on the left of each camera.
- Select the ‘UPDATE SELECTED LINXCAMS’ button from the Camera Setup toolbar.
- Update your settings to your preferences.
- Select ‘SAVE’ to apply your changes.
To update multiple cameras in a group or by camera type:
- Use the ‘Group’ or ‘Camera Type’ filters right above the Camera Setup toolbar.
- Select all of the cameras in your chosen filter options by selecting the ‘Select All’ checkbox that appears at the top of the column.
- Update your settings to your preferences.
- Select ‘SAVE’ to apply your changes.
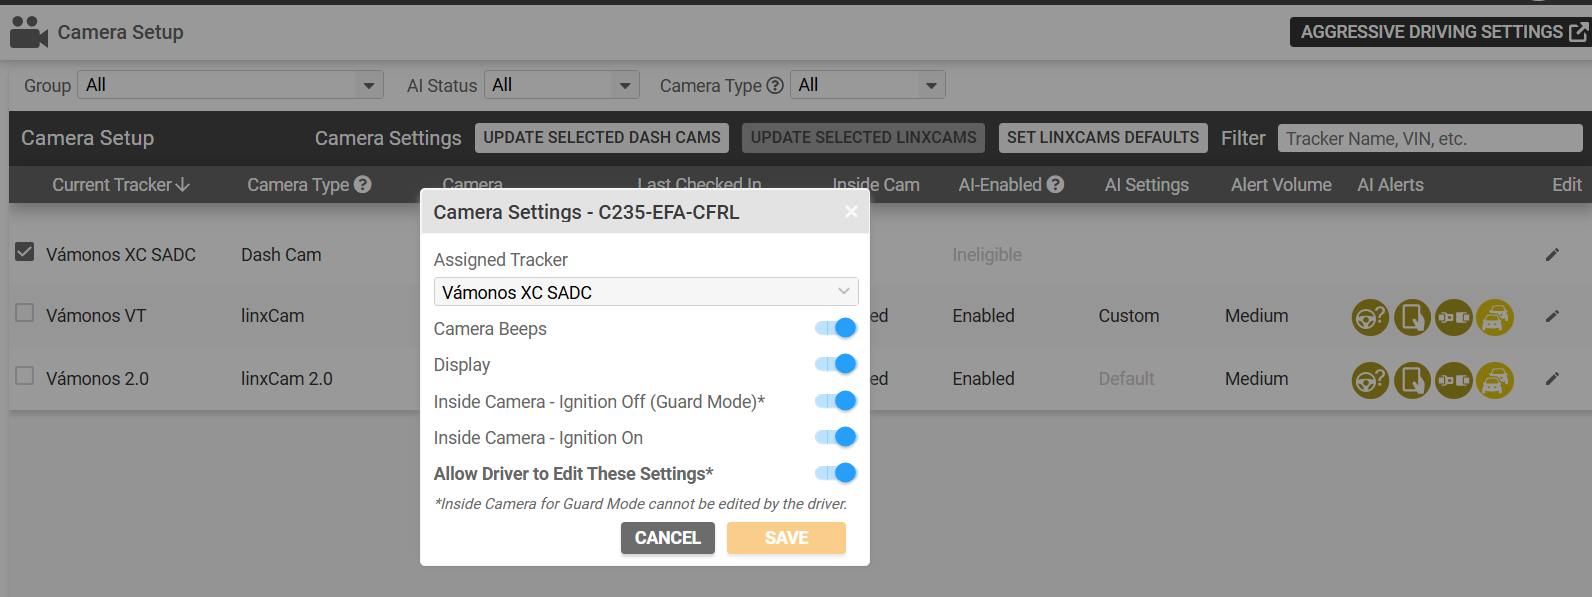
Dash Cam Settings

- Camera Beeps
- Display
- Inside Camera - Ignition Off (Guard Mode)
- Inside Camera - Ignition On
- Allow Driver to Edit These Settings*
- *Inside Camera for Guard Mode cannot be edited by the driver.
Update Dash Cam Settings
To update a single camera:
- Select the ‘Edit’ pencil icon to the right of your chosen camera.
- Update your settings to your preferences.
- Select ‘SAVE’ to apply your changes.
NOTE: A button linking you to the Aggressive Driving Alert Settings for Stand Alone Dash Cams is on the top right corner of this page as shown in the above screenshot.
To update multiple cameras:
- Select the cameras using the checkboxes on the left of each camera.
- Select the ‘UPDATE SELECTED DASH CAMS’ button from the Camera Setup toolbar.
- Update your settings to your preferences.
- Select ‘SAVE’ to apply your changes.
To update multiple cameras in a group or by camera type:
- Use the ‘Group’ or ‘Camera Type’ filters right above the Camera Setup toolbar.
- Select all of the cameras in your chosen filter options by selecting the ‘Select All’ checkbox that appears at the top of the column.
- Select the ‘UPDATE SELECTED DASH CAMS’ button from the Camera Setup toolbar.
- Update your settings to your preferences.
- Select ‘SAVE’ to apply your changes.
If you are looking for further assistance, please contact Support.
We're here to help!
877-732-4980